
HTML Tables
Mastery of HTML (Hypertext Markup Language) tables does not have the importance it once did. In the days before CSS (Cascading Style Sheets), tables were used not only to display rows and columns of data, but to control the layout of the entire web page. In fact the previous version of this web site used nested tables to manage page layout by creating table cells for the banner, navigation, content, and footer sections.
In this tutorial I am going to introduce you to the HTML tags associated with tables, some (but not all) of the attributes associated with these tags, and the use of CSS to assign values to these attributes.
If you are going to create your own HTML document to recreate the effects illustrated here, I suggest that you create a separate CSS file and call it into your HTML document by placing the following line of code in the HEAD section of your HTML document:
<link rel="stylesheet" type="text/css" href="yourCSSfilename.css" />
Following are the HTML table tags that will be used in the course of this tutorial.
- <table> </table>
- The TABLE tag defines the scope of the table beginning with the opening tag <table> and ending with the closing tag </table>. The TABLE tag has several attributes associated with it that control the overall appearance of the table. These attributes are applied to the table as a whole.
- <caption> </caption>
- The CAPTION tag is used to add a title area at the top of the table. If the CAPTION tag is used, it must immediately follow the associated TABLE tag. Note that a table can have only one CAPTION tag.
- <tr> </tr>
- The TR or table row tag is used to define a single row in a table. Obviously a table can contain many TR tags.
- <th> </th>
- The table header (TH) tag is used to define a header cell in a row. It is used much like the TD - table data - tag except that the text inside the table header cell will be displayed as bold text and will be centered within the associated column.
- <td> </td>
- The TD or table data tag is used to specify each individual data cell within a single row. Ideally, every table row will contain the same number of table data tags. For a row having fewer data cells, you will need to use the colspan attribute to control how the TD cells on that row are presented.
Table 1 below will serve as our starting point. It is a simple table with no styling or attributes set.
Table 1. Unstyled table
| column 1 heading | column 2 heading |
|---|---|
| row 1 column 1 | row 1 column 2 |
| row 2 column 1 | row 2 column 2 with extra long text inside This_is_a_link_to_http://artsnova.com/blog/ |
While it is not much to look at, this table was very simple to create. The HTML code used to create this table is:
<table>
<caption>Table caption using the caption tag</caption>
<tr><th>column 1 heading</th><th>column 2 heading</th></tr>
<tr><td>row 1 column 1</td><td>row 1 column 2</td></tr>
<tr><td>row 2 column 1</td><td>row 2 column 2 with extra long text inside
<a href="http://artsnova.com/blog/">
This_is_a_link_to_http://artsnova.com/blog/</a>
</td></tr>
</table>
Note that for every opening tag, there is an associated closing tag. Always close your tags.
A table like that above is not very attractive. More importantly, it is not very readable. We can use CSS to control the appearance of the table and improve the presentation of the data it contains. At this point I am assuming that you have had some exposure to using CSS and are somewhat familiar with CSS syntax.
Specify Table Width and Add a Border to the Table
As you can see in Table 1 the width of the table by default is 100 percent that of the available area within the container in which it sits. In this case, the container is that division of the web page in which the content is located. We will specify a value in pixels to define for ourselves how wide the table will be. I would also like to draw a border around the outside of the table.
To accomplish these two tasks, we are going to create a definition for the table tag in the CSS file. To do this, add the following entry to your CSS file:
table {width:460px; border: 1px solid #c1c1c1;}
where the syntax of the CSS statement is:
tag {attribute:value; attribute: value value value;}
The attribute width is used to specify how wide the table will be with respect to the container in which it is located. In this case we are specifying that the table be exactly 460 pixels wide. Another way to set width is by specifying a percentage. For example, width:80%; makes the width of the table dependent on the width of the container it is in. In this case the table will be 80 percent of the width of the container it is located in.
The attribute border: 1px solid #c1c1c1; specifies that the table should have a border around its outer margin and that this border will be a 1 pixel wide solid line with the color that corresponds to the hex RGB color code given. While there are a few different ways in which color can be specified, I always use the full hex RGB color code. The format is #rrggbb where rr specifies the value of the red component, gg the value of the green component and bb the value of the blue component. To see how this way of specifying color compares with the other methods, following are three different ways of specifying the color red:
| red | - natural language |
| rgb(255,0,0) | - decimal RGB values |
| #FF0000 | - hex RGB values |
Note that if you want to use the name of a color, the W3C web standards organization has stipulated that only 16 color names will pass their validation tests. As of March 2007, these 16 colors were: aqua, black, blue, fuchsia, gray, green, lime, maroon, navy, olive, purple, red, silver, teal, white, and yellow.
Following is how the table appears after adding the table size and border definition to the CSS file.
Table 2. Table Sized with Table Border
| column 1 heading | column 2 heading |
|---|---|
| row 1 column 1 | row 1 column 2 |
| Row 2 column 1 | row 2 column 2 with extra long text inside This_is_a_link_to_http://artsnova.com/blog/ |
Add A Border to Each Table Data Cell
Now to add a border to the individual cells. Add the following to your CSS file:
td, th {border: 1px solid #8C1717; }
The attribute border: 1px solid #c1c1c1; specifies that each table heading and table data element should have a border around its outer margin that is a solid line 1 pixel wide. Note that these borders will be drawn in a red hue so that we can distinguish between the table border and the table cell borders. The results are seen in Table 3.
Table 3. Table TH and TD Borders Added
| column 1 heading | column 2 heading |
|---|---|
| row 1 column 1 | row 1 column 2 |
| Row 2 column 1 | row 2 column 2 with extra long text inside This_is_a_link_to_http://artsnova.com/blog/ |
Collapse Double Borders to a Single Border
Notice that the table now has a double border: one around the table and one around each table cell. It is your choice as to whether you like this effect or not. To fix it so that there is only a single border drawn, add the border-collapse attribute to your existing CSS table entry as follows:
table {width:460px; border: 1px solid #c1c1c1;
       border-collapse: collapse;}
and observe in Table 4 the difference this makes
Table 4. Table Borders Collapsed
| column 1 heading | column 2 heading |
|---|---|
| row 1 column 1 | row 1 column 2 |
| Row 2 column 1 | row 2 column 2 with extra long text inside This_is_a_link_to_http://artsnova.com/blog/ |
Improve Readability By Adding White Space
To improve the readability of our data, we will add some white space to move the text away from the borders. To add white space around the data inside the cells, we will modify our existing definition for the TD and TH tags by adding the padding attribute. Modify your TD, TH CSS entry as follows to add four pixels of padding to each data cell:
td, th {border: 1px solid #8C1717; padding: 4px;}
Table 5. Padding Added for White Space
| column 1 heading | column 2 heading |
|---|---|
| row 1 column 1 | row 1 column 2 |
| Row 2 column 1 | row 2 column 2 with extra long text inside This_is_a_link_to_http://artsnova.com/blog/ |
Styling the Table Caption
Now let's style the table caption. To do so we will add an entry for the CAPTION tag to the CSS file. Add the following to your CSS file:
caption { font-weight:bold; color:#8C1717; background-color: #a0a0a0;}
The attribute font-weight:bold; specifies that the text should be drawn bold face. The attribute color:#8C1717; specifies the color the text should be. The attribute background-color: #a0a0a0; specifies the color to be used for the caption area's background. The product of this change is shown in Table 6.
Table 6. Table Caption Styled
| column 1 heading | column 2 heading |
|---|---|
| row 1 column 1 | row 1 column 2 |
| Row 2 column 1 | row 2 column 2 with extra long text inside This_is_a_link_to_http://artsnova.com/blog/ |
Styling the Column Headings
Now for those column headings. Let's modify our CSS for just the TH tag by adding the following new definition to the CSS file:
th { color:#8C1717; background-color: #b0b0b0;}
Note that we now have two definitions for the table heading tag in our CSS file: one defines those attributes that the table heading will have in common with the table data cell and a new one that affects only the table heading tag. Table 7 shows the results of this addition.
Table 7. Table Headings Styled
| column 1 heading | column 2 heading |
|---|---|
| row 1 column 1 | row 1 column 2 |
| Row 2 column 1 | row 2 column 2 with extra long text inside This_is_a_link_to_http://artsnova.com/blog/ |
Centering the Table on the Page
The table would look even better if it were centered on the page. To do that we will add two new attributes to the table entry in our CSS file.
table {width:94%; border: 1px solid #c1c1c1;
       border-collapse: collapse;
       margin-left: auto;  margin-right: auto;}
Pairing the margin-left and margin-right attributes with the value of auto means that the margins on the left and right side of the table will be equalized resulting in a centered table. See Table 8 for the results.
Table 8. Table Centered
| column 1 heading | column 2 heading |
|---|---|
| row 1 column 1 | row 1 column 2 |
| Row 2 column 1 | row 2 column 2 with extra long text inside This_is_a_link_to_http://artsnova.com/blog/ |
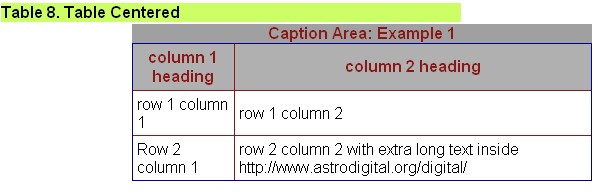
Oops. I think something's wrong. Our centered table displays as follows in Internet Explorer 6:
Image 1. Table as Displayed by Internet Explorer 6
But in Firefox 1.5 our table displays as follows:
Image 2. Table as Displayed by Firefox 1.5
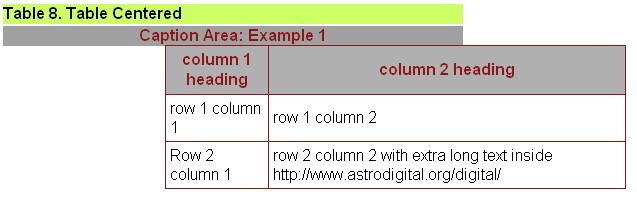
Did you notice the caption area? It no longer lines up. This is because Firefox is strictly following our instructions. We did not specify auto margins for the caption - only the table. Internet Explorer ASSUMES we want to center our caption. But maybe we don't want to center our caption. Personally I prefer that the browser not make assumptions on my behalf.
So let's do this right. Add the margin attribute and auto option to our caption tag in the CSS file as follows:
caption { font-weight:bold; color:#8C1717; background-color: #a0a0a0;
          margin-left: auto; margin-right: auto;}
and now our caption and table are both centered.
Table 8a. Caption and Table Centered
| column 1 heading | column 2 heading |
|---|---|
| row 1 column 1 | row 1 column 2 |
| Row 2 column 1 | row 2 column 2 with extra long text inside This_is_a_link_to_http://artsnova.com/blog/ |
Text Alignment
Another way the appearance of the table could be improved is to get the text in the separate data cells to line up nicely. For the vertical alignment, we can do this by going back to our TH and TD CSS definition and adding the vertical-align attribute and specifying the value of top which will force the text in all cells to be aligned with the top of the containing data cell. Following is the modified definition for the TH and TD CSS entry:
td, th {border: 1px solid #8C1717; padding: 4px;
        vertical-align: top;}
Table 9. Table Text Vertically Aligned
| column 1 heading | column 2 heading |
|---|---|
| row 1 column 1 | row 1 column 2 |
| Row 2 column 1 | row 2 column 2 with extra long text inside This_is_a_link_to_http://artsnova.com/blog/ |
A Border for the Caption
One thing missing is a border around our caption. Let's make this a double border and give it the same color as the other cell borders. Modify the existing CSS entry for the caption tag so it matches the following:
caption { font-weight:bold; color:#8C1717; background-color: #a0a0a0;
          margin-left: auto; margin-right: auto;
          border: double #00009C;}
Take a look at Table 10 to see the results.
Table 10. Border Added to the Table Caption
| column 1 heading | column 2 heading |
|---|---|
| row 1 column 1 | row 1 column 2 |
| Row 2 column 1 | row 2 column 2 with extra long text inside This_is_a_link_to_http://artsnova.com/blog/ |
And In Closing
There is a lot more that could be done with the table and its contents. You could alter the horizontal alignment of the text in the cells. You could also specify the physical width of the cells in a column. For a large table with lots of rows and columns, readability can be improved by alternating the color of individual rows. If you are using XHTML to create your web pages, you will also be able to use the tags THEAD, TBODY, and TFOOT.
In closing, this tutorial has only scratched the surface of controlling the appearance of tables using CSS. Hopefully this tutorial has served as a good starting point for your exploration of HTML tables and CSS.
Return to the HTML section index.
Copyright ©1999-2023, Astrodigital, http://www.astrodigital.org. All rights reserved. Direct questions, problems and update notification requests to Contact